- raptor660-oiltank.jpg (34.98 KiB) Viewed 6641 times

MZ/MuZ Riders
A community for owners and riders or MZ Motorcycles, Scooters, and ATVs.
Project Cafe Rocket 686 begins. Finally!
Moderators: DAVID THOMPSON, phlat65
Re: Project Cafe Rocket 686 begins. Finally!
![]() by edfmaniac » Sun Mar 31, 2013 10:47 pm
by edfmaniac » Sun Mar 31, 2013 10:47 pm
This is the oil tank that's going in my bike. It's built for the Raptor. Although it doesn't have the design parameters listed in your blog Bill, I'm hoping it will do the job. It's getting mounted about where the stock air box/battery were. Return and vent on top w/main engine feed coming from the bottom.
01 Skorpion Traveler 660
- edfmaniac
- Posts: 768
- Joined: Tue Jun 21, 2011 10:56 pm
- Location: Austin, TX
Re: Project Cafe Rocket 686 begins. Finally!
![]() by Bill Jurgenson » Mon Apr 01, 2013 12:45 am
by Bill Jurgenson » Mon Apr 01, 2013 12:45 am
here is my drawing. Yesterday I did not have it at hand. I corrected the measurement in the message farther up.
The 140mm OD is of course the rough Ø for making. The final Ø is done as said above after the part has been shrunk together.
The 140mm OD is of course the rough Ø for making. The final Ø is done as said above after the part has been shrunk together.
-

Bill Jurgenson - Posts: 688
- Joined: Sat Nov 18, 2006 1:30 am
- Location: D-74348 Lauffen am Neckar
Re: Project Cafe Rocket 686 begins. Finally!
![]() by Bill Jurgenson » Mon Apr 01, 2013 1:23 am
by Bill Jurgenson » Mon Apr 01, 2013 1:23 am
there are serious issues with that tank. The return line top center is as far off base as is conceivable. Even the MZ plastic thing is better .
Don't take my word for it. Checkout just about any serious text book on the subject. The return line must be made that any sloshing (=aerating) is avoided at all costs. That is why nearly all commercially available tanks are round with the return line placed tangentially very near the top . The oil then flows around the inside of the tank down to the content level. There are often also horizontal slosh sieves quite like those used in oil pans above the oil level. There is extremely good reason for their being round. Where there are dictating placement parameter as often in F1 cars, the oil tanks are very intricate systems of precoolers and breathers before the oil actually gets to the tank.
https://www.highpowermedia.com/RET-Monitor/3182/oil-tanks
https://www.highpowermedia.com/RET-Monitor/3022/the-swirl-tank
The other which is not evident from the picture is the volume of the tank which iobviously dictates size but also shape. The general rule of thumb is that the tank should be about 1/3 larger than the actual oil content and this additional 1/3 is as high as possible to allow the oil as much room as possible to flow down and quite.

So, the Raptor tank dos not fulfill any of these requisites. Motorcycle oil tanks are very often marginal and only work reasonably well by virtue of sheer size as the British classics.
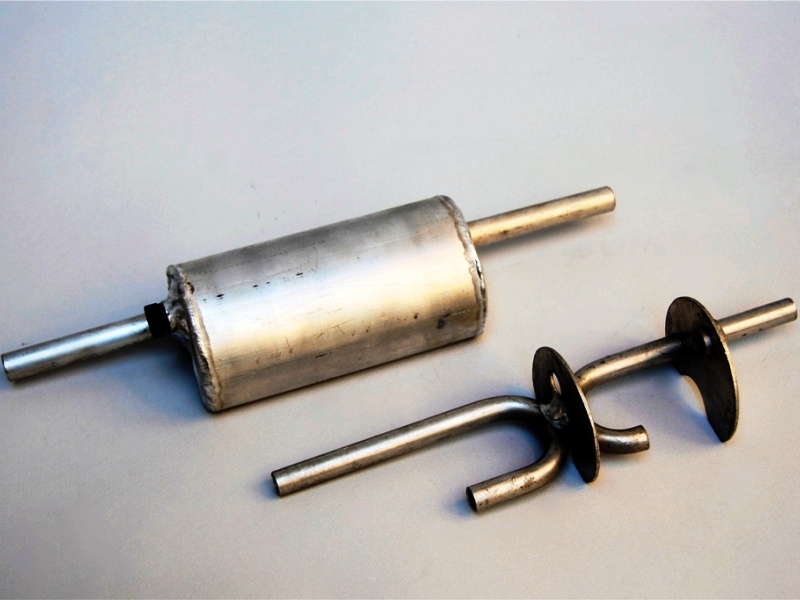
The SZR tank (photo above of the exhaust headers) is certainly no gem but it is very high and well oversized. In particular, the aerating section is very tall and slender. The SZR has fewer issues with oil consumption than the MZ tank. The plastic MZ tank at least has the return line so that the oil flows along the inside perimeter around the corner and down into the content. The flat form is the problem and, as can be easily seen, the reason why one should NEVER put more oil in that tank than the minimum mark.
BTW
It is time well wasted to read through ASMP:
https://www.highpowermedia.com/RET-Monitor
Don't take my word for it. Checkout just about any serious text book on the subject. The return line must be made that any sloshing (=aerating) is avoided at all costs. That is why nearly all commercially available tanks are round with the return line placed tangentially very near the top . The oil then flows around the inside of the tank down to the content level. There are often also horizontal slosh sieves quite like those used in oil pans above the oil level. There is extremely good reason for their being round. Where there are dictating placement parameter as often in F1 cars, the oil tanks are very intricate systems of precoolers and breathers before the oil actually gets to the tank.
https://www.highpowermedia.com/RET-Monitor/3182/oil-tanks
https://www.highpowermedia.com/RET-Monitor/3022/the-swirl-tank
The other which is not evident from the picture is the volume of the tank which iobviously dictates size but also shape. The general rule of thumb is that the tank should be about 1/3 larger than the actual oil content and this additional 1/3 is as high as possible to allow the oil as much room as possible to flow down and quite.
So, the Raptor tank dos not fulfill any of these requisites. Motorcycle oil tanks are very often marginal and only work reasonably well by virtue of sheer size as the British classics.
The SZR tank (photo above of the exhaust headers) is certainly no gem but it is very high and well oversized. In particular, the aerating section is very tall and slender. The SZR has fewer issues with oil consumption than the MZ tank. The plastic MZ tank at least has the return line so that the oil flows along the inside perimeter around the corner and down into the content. The flat form is the problem and, as can be easily seen, the reason why one should NEVER put more oil in that tank than the minimum mark.
BTW
It is time well wasted to read through ASMP:
https://www.highpowermedia.com/RET-Monitor
-
Bill Jurgenson - Posts: 688
- Joined: Sat Nov 18, 2006 1:30 am
- Location: D-74348 Lauffen am Neckar
Re: Project Cafe Rocket 686 begins. Finally!
![]() by breakwellmz » Mon Apr 01, 2013 3:35 am
by breakwellmz » Mon Apr 01, 2013 3:35 am
Bill Jurgenson wrote:I blush
seriously, I forgot to add that without the weight, there is no reason to replace that gear. There is no possible danger and practically no wear to the keys of either shaft.
First of all welcome back Bill
Were you not a little apprehensive prior to first starting up and riding the engine you removed the balancer from?
I would ASSUME it would shake itself and you to pieces.
Saying that,probably no worse than the 580 CCM/BSA B50 i owned!
- breakwellmz
- Posts: 805
- Joined: Sun Dec 16, 2007 7:11 am
- Location: SW England
Re: Project Cafe Rocket 686 begins. Finally!
![]() by Bill Jurgenson » Mon Apr 01, 2013 8:21 am
by Bill Jurgenson » Mon Apr 01, 2013 8:21 am
no.
at idle and very low rpm it is much better. you could turn the warm engine idle down to 800 or less, no problem even with the light flywheel. it just ticked like an old Guzzi. The stock engine will not run at all at such low speed. Not that there is any virtue in that.
Likewise better above 6000.
at 4000 it is quite nasty, tho, but that is a range I don't use much.
-
Bill Jurgenson - Posts: 688
- Joined: Sat Nov 18, 2006 1:30 am
- Location: D-74348 Lauffen am Neckar
Re: Project Cafe Rocket 686 begins. Finally!
![]() by samandkimberly » Mon Apr 01, 2013 1:52 pm
by samandkimberly » Mon Apr 01, 2013 1:52 pm
Here's a possible decent, cheap tank:
http://www.racingpartdepot.com/servlet/ ... DRY/Detail
Not bad at 80 bucks, though you'd have a lot of extra ports to plug. Capacity is listed at 2 1/2 quarts, size is 5" dia by 12" tall, which calculates to a ~4qt total volume. It might fit nicely where the airbox is.
I have no idea as to the quality, or whats inside as far as baffles.
Sam
- tank.JPG (6.51 KiB) Viewed 6615 times
http://www.racingpartdepot.com/servlet/ ... DRY/Detail
Not bad at 80 bucks, though you'd have a lot of extra ports to plug. Capacity is listed at 2 1/2 quarts, size is 5" dia by 12" tall, which calculates to a ~4qt total volume. It might fit nicely where the airbox is.
I have no idea as to the quality, or whats inside as far as baffles.
Sam
-

samandkimberly - Posts: 160
- Joined: Wed Jan 14, 2009 7:12 am
- Location: Outside Boston
Re: Project Cafe Rocket 686 begins. Finally!
![]() by Bill Jurgenson » Tue Apr 02, 2013 2:47 am
by Bill Jurgenson » Tue Apr 02, 2013 2:47 am
It looks very good. 12" cold be too tall of course, but that is easy enuf to check out. Mine is not that high, as I remember; don't have it at hand at the moment since the bike is in storage until I get the engine built.


The linked tank is smaller in diameter and has the outlets on the side, one of which can be easily plugged. Otherwise, there are not too many connections. I have a Wilbers Racing strut with its hydraulic line which takes up more room than a simple strut. I also have the outlet on the bottom, utilizing the original coarse sieve and banjo connection so my tank cannot be anywhere near as tall. That is why it is larger in Ø. Hung from the original Sport fairing mounting points, it goes right up to the underside of my seat fairing, the original MZ filler cap touches and cannot come undone. The dipstick is of course useless. As one can see, I have transparent tube on the back showing the oil level.
The linked tank is perfect for size and the 2 1/2qts (or 3) a both for the size idea and for the bike. Of course I do not have the airbox but I did not have it before either, having long since dumped it in favor of a large K&N cone filter. The racing engine had no filters, just ram stacks. None of my veterans had filters, either, and none of then fell apart for that reason.

The underside of my tray (still of plywood in its 4th year and still not falling apart) does not show much but you do see the oil catch can for the crankcase vent. This is an readily available item common in the veteran racing scene.
http://www.motocicliveloci.it/inglese/catalogue/accessori_uk.htm
Maurizio has lots of goodies and is a good, realistic business partner in my experience.
You also see the gas can and high- and low-speed adjustments of the strut. The tray fills the modified OEM tail frame entirely. On top, the electric stuff is easily accessible and is protected.
From the front edge, the SilentHektik solid-state fusebox with blinker, the Ignitech Sparker and starter solenoid next to it and the LiFePo battery with its separate posts so the it can be easily removed without undoing any of the harness.
nuf for now
The linked tank is smaller in diameter and has the outlets on the side, one of which can be easily plugged. Otherwise, there are not too many connections. I have a Wilbers Racing strut with its hydraulic line which takes up more room than a simple strut. I also have the outlet on the bottom, utilizing the original coarse sieve and banjo connection so my tank cannot be anywhere near as tall. That is why it is larger in Ø. Hung from the original Sport fairing mounting points, it goes right up to the underside of my seat fairing, the original MZ filler cap touches and cannot come undone. The dipstick is of course useless. As one can see, I have transparent tube on the back showing the oil level.
The linked tank is perfect for size and the 2 1/2qts (or 3) a both for the size idea and for the bike. Of course I do not have the airbox but I did not have it before either, having long since dumped it in favor of a large K&N cone filter. The racing engine had no filters, just ram stacks. None of my veterans had filters, either, and none of then fell apart for that reason.
The underside of my tray (still of plywood in its 4th year and still not falling apart) does not show much but you do see the oil catch can for the crankcase vent. This is an readily available item common in the veteran racing scene.
http://www.motocicliveloci.it/inglese/catalogue/accessori_uk.htm
Maurizio has lots of goodies and is a good, realistic business partner in my experience.
You also see the gas can and high- and low-speed adjustments of the strut. The tray fills the modified OEM tail frame entirely. On top, the electric stuff is easily accessible and is protected.
From the front edge, the SilentHektik solid-state fusebox with blinker, the Ignitech Sparker and starter solenoid next to it and the LiFePo battery with its separate posts so the it can be easily removed without undoing any of the harness.
nuf for now
-
Bill Jurgenson - Posts: 688
- Joined: Sat Nov 18, 2006 1:30 am
- Location: D-74348 Lauffen am Neckar
Re: Project Cafe Rocket 686 begins. Finally!
![]() by edfmaniac » Thu Apr 04, 2013 9:55 am
by edfmaniac » Thu Apr 04, 2013 9:55 am
Here's the pics of the head. I expected a little better finish work after looking at the guys website but I'm sure it's only looks.
01 Skorpion Traveler 660
- edfmaniac
- Posts: 768
- Joined: Tue Jun 21, 2011 10:56 pm
- Location: Austin, TX
Re: Project Cafe Rocket 686 begins. Finally!
![]() by edfmaniac » Thu Apr 04, 2013 9:57 am
by edfmaniac » Thu Apr 04, 2013 9:57 am
01 Skorpion Traveler 660
- edfmaniac
- Posts: 768
- Joined: Tue Jun 21, 2011 10:56 pm
- Location: Austin, TX
Re: Project Cafe Rocket 686 begins. Finally!
![]() by den » Thu Apr 04, 2013 3:39 pm
by den » Thu Apr 04, 2013 3:39 pm
its good to see the ports have been left abit rough , old school would have made the mirror finish ,this would look impressive but believe it of not the slight rough surface actually sends the petrol vapor mix into a bit of cloudy chaos thus expanding its volume/mix ,,a more polished surface lets the mixture flow too dense like a jet Rather than a gas,
so i believe,,
so i believe,,
Oh mutly,,you did it again,she he he he he ehheheheh
-

den - Posts: 509
- Joined: Tue May 17, 2011 12:03 pm
- Location: leicester
Re: Project Cafe Rocket 686 begins. Finally!
![]() by edfmaniac » Thu Apr 04, 2013 5:20 pm
by edfmaniac » Thu Apr 04, 2013 5:20 pm
I do remember reading about keeping the intake surface rough to inhibit fuel from condensing on it but I was picturing something more like the intake in the picture below. It looks like it was media blasted after the port shaping was done. Also, my head just looked like it had been moved around a lot after the machine work. There are a few scratches in the head surface where they honed it flat and you could tell that they accidentally ground off a corner of the carb spacer in the process. No big deal but it seems like something a green apprentice would do, and it's certain that they had to remove the spacer and re-hone the head without it in place, because now the spot on the spacer and the head are in slightly different planes(.5mm or so).
Whoever did the work on this head gets my thumbs up.
And here's a hi res photo of mine for comparison. It's flat, and it should seal up fine, but it's no Picasso.
- Not our head. Just and example of a different technique.
Whoever did the work on this head gets my thumbs up.
And here's a hi res photo of mine for comparison. It's flat, and it should seal up fine, but it's no Picasso.
Last edited by edfmaniac on Fri Jun 07, 2013 1:17 am, edited 1 time in total.
01 Skorpion Traveler 660
- edfmaniac
- Posts: 768
- Joined: Tue Jun 21, 2011 10:56 pm
- Location: Austin, TX
Re: Project Cafe Rocket 686 begins. Finally!
![]() by Bill Jurgenson » Thu Apr 04, 2013 9:37 pm
by Bill Jurgenson » Thu Apr 04, 2013 9:37 pm
hi,
I can't see that anything except blasting was done to that other head you show. the valves were definitely not reground. clean it is but that's all. Your valves were reground. A photo or two without the valves would show a whole lot more. what I don't like is that the center intake is not as deeply set as the other two. It should be set 1-2mm deeper than those. The milled surface is not as pretty but that is unimportant. the surface inside the ports is fine; I like it better than the other which already too smooth. The rough surface is not only about condensation, the eddies at the molecular lever it causes actually make for less drag as a whole than the traditional polished surface.
What I can't much see is what he actually did in terms of porting. He obviously did not correct the siamese port from the left for dual carbs of the same size. there is a limit of course as long as the original rubber mounts are used. The intakes were enlarged and the the spacer matched, the whole making a smooth taper. I appears that material was removed behind the valves, above the seats as should be. with the valves in place, you cannot see the areas that really count. and you don't show the exhaust side. I don't like the grinding back of the stems.
I assume you plan to run a TM34-B70 or so something similar.
What size exhaust header?
when I am back home, I will look for pics.
-
Bill Jurgenson - Posts: 688
- Joined: Sat Nov 18, 2006 1:30 am
- Location: D-74348 Lauffen am Neckar
Re: Project Cafe Rocket 686 begins. Finally!
![]() by edfmaniac » Thu Apr 04, 2013 11:34 pm
by edfmaniac » Thu Apr 04, 2013 11:34 pm
Actually those are +1 valves. He had to go up a size because my intake seats were in bad shape and the original valves were very, very worn out where they make contact. We talked about siamese porting briefly but only as an option for more radical builds, although I do wished he had opened up the cross over port a little more. As for the rest of the porting work, he said that the short sides and bowls on the intake received most of the attention. I can't remove the valves for photos of that work because I'm not prepared with the proper tools for reassembly. Here's some better pics of the valves and one of the exhaust ports. Long term plans include the TM34's and I'm using the ProJection Components headers.
To the amateur eye, it seems like the exhausts could have been opened up quite a bit but he said they were close to optimal in our first conversation.
01 Skorpion Traveler 660
- edfmaniac
- Posts: 768
- Joined: Tue Jun 21, 2011 10:56 pm
- Location: Austin, TX
Re: Project Cafe Rocket 686 begins. Finally!
![]() by Geoff7yea » Mon Apr 08, 2013 5:38 pm
by Geoff7yea » Mon Apr 08, 2013 5:38 pm
Nice one with the pics of the head, they've got to be some of the only pics of a ported 5valve 660 head on the internet it would seem.
Bill- you mentioned the area's that matter when it comes to the head work, is there an ideal finish to our mz head? i.e key areas to work on.
If you're in the process of digging up pictures etc sorry for being a bit eager!
Bill- you mentioned the area's that matter when it comes to the head work, is there an ideal finish to our mz head? i.e key areas to work on.
If you're in the process of digging up pictures etc sorry for being a bit eager!
- Geoff7yea
- Posts: 13
- Joined: Tue Jul 20, 2010 11:20 am
Re: Project Cafe Rocket 686 begins. Finally!
![]() by edfmaniac » Thu May 09, 2013 3:25 am
by edfmaniac » Thu May 09, 2013 3:25 am
I sent off the cam to Megacycle today for an X4 grind. 
01 Skorpion Traveler 660
- edfmaniac
- Posts: 768
- Joined: Tue Jun 21, 2011 10:56 pm
- Location: Austin, TX
Who is online
Users browsing this forum: No registered users and 33 guests